How To Enable Command Line Interface And Install Manila Client
OpenStack is a cloud environment which means that you access it by calling various API endpoints. Obviously, you can call an API point using web browser or curl, but that is neither easy nor elegant. You can communicate through Horizon, which is an OpenStack front end type of site and finally, you can communicate through commands from the command line interface, in a terminal.
Using commands from terminal is often times the only way to do something as Horizon does not implement all pf the available API calls. So, learning and using the CLI is a must for any serious user of OpenStack modules, in this case, the manila client.
The Prerequisite No. 3 shows how to connect from terminal to the cloud but then goes on using the commands for Kubernetes clusters. Here, you will connect to the cloud in a similar manner but will, in the next article (see Prerequisite No. 4), use CLI to create a shared file system.
What We Are Going To Cover
How to connect to the cloud as a local user
Install Python and pip (note, you may have these already up and running)
Install the OpenStack and Manila clients (again, you may have OpenStack client already installed)
Connect to the server by sending the credentials to the cloud
Verify that you are connected by listing projects that exist in the system
Prerequisites
Step 1 Enable Command Line Interface For Local User
In this step, you will connect local user to the server through the Command Line Interface on your desktop or virtual server. In the main menu on the left, first click on Project -> API Access and then download the OpenStack RC file from the button on the right side of the screen:

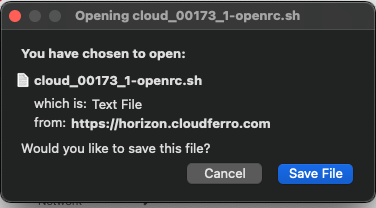
Get a prompt like this (depending on the browser):

Click on Save File and save it to the Downloads directory on your computer. The file name will be cloud_00173_1-openrc.sh and it is a bash file, that is, an executable script on MacOS and Linux computers.
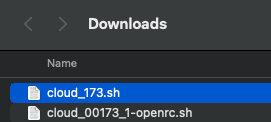
Rename the file to be cloud_173.sh for ease of typing later on.

Step 2 Install Python and pip
In this step, you will install Python, pip and the clients needed for using the shared file system.
It may well happen that you have already installed some of these components, in which case the following commands will just update the existing installation to the latest version.
Assuming you are on Ubuntu or Mac, the first command is to update the system:
$ sudo apt update
The next step, as is always the case with Python, is to define a virtual environment. Let the arbitrarily chosen name of this environment be pirx:
$ python3 -m venv pirx
It will create a folder in the current structure so move into it and execute the follow up commands over there:
$ cd pirx/
$ source bin/activate
The activate command activates the virtual environment, meaning that all of the further steps will be available only in that environment and folder.
Step 3 Install the OpenStack and Manila Clients
In this step you will install the clients needed to communicate with the server.
In pirx environment and the eponymous folder, execute the following commands:
pip install --upgrade pip
pip install python-openstackclient
pip install python-manilaclient==2.2.0
Again, you may have already had installed the OpenStack client while following up other articles, say, for Kubernetes. If so, its version will be resfreshed, however, installing manilaclient is the absolute novelty. It is this client that will provide access to the shared file system and the version shown, 2.2.0 is important for compatibility reasons.
Step 4 Connect to the Server
In this step, you will personalize the connection to the server. First copy bash file from Downloads folder to the pirx folder:
$ cp /Users/duskosavic/Downloads/cloud_173.sh .
Obviously, the Downloads folder on your system will have another address, so be sure to apply the correct address to this command.
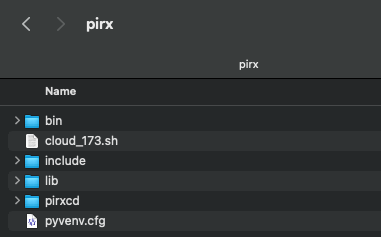
Here is what the pirx folder looks like on the inside:

Execute bash file cloud_173.sh, using the source command:
$ source ./cloud_173.sh
You will be prompted to enter the password for user admin-eumetsat-internal. The screen won’t show that you have entered anything but if everything is ok, a new folder prompt will appear.

Use cat command to show contents of the file cloud_173.sh:
$ cat cloud_173.sh
The file contains a set of parameters that are needed for communication with the server.
#!/usr/bin/env bash
# To use an OpenStack cloud you need to authenticate against the Identity
# service named keystone, which returns a **Token** and **Service Catalog**.
# The catalog contains the endpoints for all services the user/tenant has
# access to - such as Compute, Image Service, Identity, Object Storage, Block
# Storage, and Networking (code-named nova, glance, keystone, swift,
# cinder, and neutron).
#
# *NOTE*: Using the 3 *Identity API* does not necessarily mean any other
# OpenStack API is version 3. For example, your cloud provider may implement
# Image API v1.1, Block Storage API v2, and Compute API v2.0. OS_AUTH_URL is
# only for the Identity API served through keystone.
unset OS_TENANT_ID
unset OS_TENANT_NAME
export OS_AUTH_URL=https://keystone.cloudferro.com:5000/v3
export OS_INTERFACE=public
export OS_IDENTITY_API_VERSION=3
export OS_USERNAME="admin-eumetsat-internal"
export OS_REGION_NAME="WAW3-1"
export OS_PROJECT_NAME="cloud_00173_1"
export OS_PROJECT_DOMAIN_ID="98ae4545b7a9400cb8e4a1b1f6d81ff0"
if [ -z "$OS_REGION_NAME" ]; then unset OS_REGION_NAME; fi
if [ -z "$OS_USER_DOMAIN_NAME" ]; then unset OS_USER_DOMAIN_NAME; fi
if [ -z "$OS_PROJECT_DOMAIN_ID" ]; then unset OS_PROJECT_DOMAIN_ID; fi
echo "Please enter your OpenStack Password for project $OS_PROJECT_NAME as user $OS_USERNAME: "
read -sr OS_PASSWORD_INPUT
export OS_PASSWORD=$OS_PASSWORD_INPUT
export OS_AUTH_TYPE=password%
One parameter is missing though, so enter it manually from the terminal command line:
export OS_USER_DOMAIN_NAME=cloud_00173
Use the same name and cloud number as in variable OS_PROJECT_NAME, here it is cloud_00173, without the trailing _1.
Verify that you are authorized to issue commands to the server by executing this command:
openstack project list
This is the result:

The ID of the project is 976728e279714cb5a27de3c685803b6c and make note of it as you will use it latter articles in the series abour installing shared file system under OpenStack.
You have access to the server now, through a CLI interface on your desktop computer or server.
What To Do Next
In Prerequisite No. 4 you will complete this installation and create a share, which is a shared file system in an instance (virtual machine).