How To Install Shared File System Based On Manila OpenStack
In previous articles in this series, you have created a
local user with role member
manila-user role and manila-network
obtained manila-network ID
connected to the server via CLI
obtained ID of the current project.
Your goal now is to install shared file system under OpenStack and test it.
What We Are Going To Cover
You are now going to
Create share network
Create instance which will act as the external memory
Get necessary local addresses to connect the instance with the manila-network
Create share file system within the instance and mount it
Create a test file and show that it persists in the mounted folder.
Prerequisites
No. 1 Hosting
You need a Eumetsat Elasticity hosting account with Horizon interface https://horizon.cloudferro.com/auth/login/?next=/.
No. 1 How To Create a Local Horizon User 1/5
No. 2 How To Create Manila Network and Manila User Role 2/5
Manila network values to use from that article:
manila network address 10.83.80.0/22.
manila-network ID 4631e9e4-9283-4234-8a95-4f1e6695dc4f
No. 3 How To Enable Command Line Interface And Install Manila Client 3/5
Project ID to use from that article: 976728e279714cb5a27de3c685803b6c.
No. 4 How To Install Shared File System Based On Manila OpenStack 4/5
This is the article that you are reading now.
No. 5 How To Increase Security For Shared File System Based On Manila OpenStack 5/5
No. 6 Private and public keys
An SSH key-pair created in OpenStack dashboard. To create it, follow this article How to create key pair in OpenStack Dashboard on Eumetsat Elasticity.
No. 7 Instructions to insert SSH key into the instance
This article How to add SSH key from Horizon web console on Eumetsat Elasticity will show you how to insert SSH keys from the console view in browser. After that, you will be able to access the contents of the virtual machine which will contain the shared files systems files.
No. 8 Connecting to the virtual machine with SSH from Linux
How to connect to your virtual machine via SSH in Linux on Eumetsat Elasticity
No. 9 Connecting to the virtual machine with SSH from Windows 10
Follow this article How to connect to a virtual machine via SSH from Windows 10 Command Prompt on Eumetsat Elasticity.
No. 10 Create a new Linux VM in OpenStack dashboard (Horizon)
The article to use is How to create new Linux VM in OpenStack Dashboard Horizon on Eumetsat Elasticity.
No. 11 Manila Documentation
Step 1 Create Share Network with Specific Name
In this step, you will create a share network with 1000 GB of space.
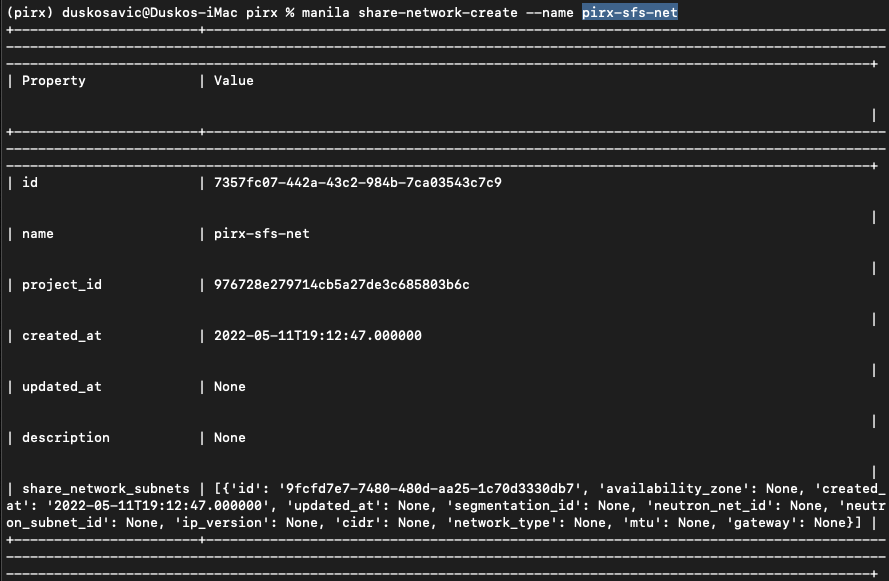
Presume that you have just executed commands in Prerequisite No. 4 and that the CLI is fully operational. Then the following command will create share network with the arbitrary name of pirx-sfs-net:
manila share-network-create --name pirx-sfs-net
The result in terminal looks unmanageable as this command has no prettyprinting facilities:

Fortunately, you will need only the property id from that output, which here is 7357fc07-442a-43c2-984b-7ca03543c7c9. Let us call it SHARE_NETWORK_ID.
You now have all the data to define a share with an amount of storage in GB. The general command would look like this:
openstack share create --name $SHARE_NAME$ --share-type SFS --share-network $SHARE_NETWORK_ID$ NFS $SIZE_IN_GB$
In this case, you are going to create a share of 1000 GB:
openstack share create --name pirx-sfs-share --share-type SFS --share-network 7357fc07-442a-43c2-984b-7ca03543c7c9 NFS 1000 -f json
The result in JSON format is:
{
       "access_rules_status": "active",
       "availability_zone": null,
       "create_share_from_snapshot_support": false,
       "created_at": "2022-05-11T19:27:11.000000",
       "description": null,
       "has_replicas": false,
       "id": "5f682131-412a-4024-af2c-e60db0cb10a7",
       "is_public": false,
       "metadata": {},
       "mount_snapshot_support": false,
       "name": "pirx-sfs-share",
       "progress": null,
       "project_id": "976728e279714cb5a27de3c685803b6c",
       "replication_type": null,
       "revert_to_snapshot_support": false,
       "share_group_id": null,
       "share_network_id": "7357fc07-442a-43c2-984b-7ca03543c7c9",
       "share_proto": "NFS",
       "share_type": "afe43b62-1c79-41e0-bded-05cbf1ab4020",
       "share_type_name": "SFS",
       "size": 1000,
       "snapshot_id": null,
       "snapshot_support": false,
       "source_share_group_snapshot_member_id": null,
       "status": "creating",
       "task_state": null,
       "user_id": "035e6a94dce14122a5fd1e0f23562241",
       "volume_type": "SFS"
     }
You have created a share in shared file system which can be accessed from relevant instances – virtual machines.
Keep note of id from the above output, here it is 5f682131-412a-4024-af2c-e60db0cb10a7 as you will need it later on.
In the next step, you are going to create an instance and connect it to the share.
Step 2 Create an Instance With Floating IP Address
Please see Prerequisite No. 9 how to create a new instance in Horizon.
Warning
Create or have already created a key pair that you are going to use. See Prerequisite No. 4 where you will create a key pair called sshkey. In this text, we are using another key pair, ssh333.
For image use Ubuntu 20.04 LTS, add two networks – cloud_00173_1 and manila-network, use flavor eo1.xmedium, a key pair and if you do not specify it, only the default security group will be attached to the instance. Let its name be pirx-vm and use Prerequisite No. 8 to add a floating IP address to it. The result should look like this:

The floating IP address, which is the address to use for remote access to instance, is 64.225.133.134.
Step 3 Gain Access to Instance
The virtual machine pirx-vm runs under Ubuntu and has two predefined users,
eoconsole – used only to gain access to Ubuntu and change the password, and
eouser – used for remote access to the command line.
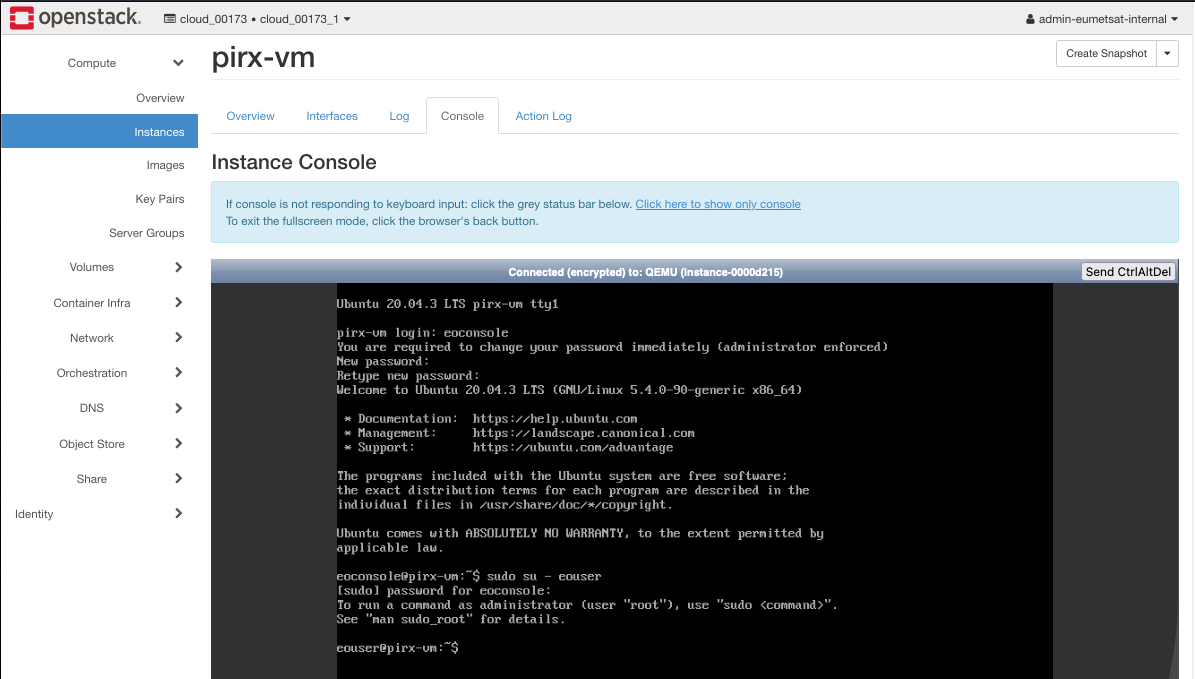
The main disadvantage of eoconsole is that it does not support copy and paste. You have to enter manually each and every command, and as you see will below, that is not practical.
One way to activate eouser is using the command:
sudo su - eouser
and enter the password; that will change the user to eouser in the browser console.

You will then use it as eouser but still will not be able to paste and copy in the browser console window.
The other way to communicate via eouser is described in Prerequisite Nos. 6 and 7. Using ssh with a local client is, of course, the preferred way.
In this step, you have gained acceess to the instance, via eouser, which will allow you to copy and paste commands from the local ssh client to the server.
Step 4 Get Address of the Shared Data in an Instance
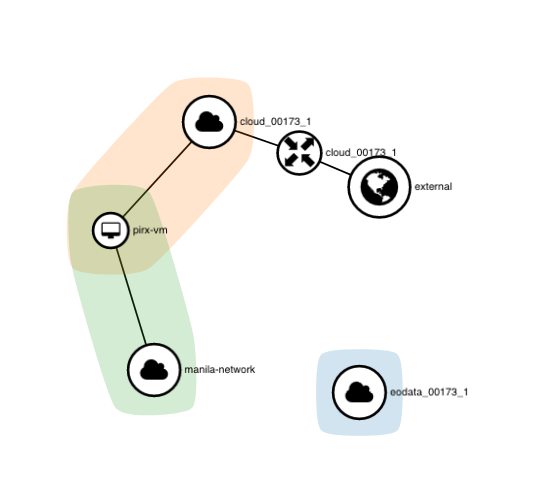
Here is the network topology after creating the network and a new instance:

To find the local address of the instance, issue the following command in console:
ip a
This is the result:
eouser@pirx-vm:~$ ip a
1: lo: <LOOPBACK,UP,LOWER_UP> mtu 65536 qdisc noqueue state UNKNOWN group default qlen 1000
        link/loopback 00:00:00:00:00:00 brd 00:00:00:00:00:00
        inet 127.0.0.1/8 scope host lo
           valid_lft forever preferred_lft forever
        inet6 ::1/128 scope host
           valid_lft forever preferred_lft forever
2: eth0: <BROADCAST,MULTICAST,UP,LOWER_UP> mtu 8942 qdisc mq state UP group default qlen 1000
        link/ether fa:16:3e:25:8c:e5 brd ff:ff:ff:ff:ff:ff
        inet 10.0.0.221/24 brd 10.0.0.255 scope global dynamic eth0
           valid_lft 42583sec preferred_lft 42583sec
        inet6 fe80::f816:3eff:fe25:8ce5/64 scope link
           valid_lft forever preferred_lft forever
3: eth1: <BROADCAST,MULTICAST,UP,LOWER_UP> mtu 9000 qdisc mq state UP group default qlen 1000
        link/ether fa:16:3e:71:19:bd brd ff:ff:ff:ff:ff:ff
        inet 10.83.80.141/22 brd 10.83.83.255 scope global dynamic eth1
           valid_lft 42583sec preferred_lft 42583sec
        inet6 fe80::f816:3eff:fe71:19bd/64 scope link
           valid_lft forever preferred_lft forever
See where the address 10.83.80.141 is, fourth row from bottom. The address will be different in your case but you will be able to find in the same place as in this example.
That is the address you need to access the shared file system.
Now switch to the terminal. Here is the general command to create access to a share:
openstack share access create $SHARE_ID$ ip $ADRESS_IP$
In our case, the values and the results are:
openstack share access create 5f682131-412a-4024-af2c-e60db0cb10a7 ip 10.83.80.141 -f json

     {
       "id": "69eae250-e48e-413e-8ee7-fdbb6e6dc079",
       "share_id": "5f682131-412a-4024-af2c-e60db0cb10a7",
       "access_level": "rw",
       "access_to": "10.83.80.141",
       "access_type": "ip",
       "state": "queued_to_apply",
       "access_key": null,
       "created_at": "2022-05-13T10:36:09.000000",
       "updated_at": null,
       "properties": ""
     }
From this you will need only the share_id value, to show the share we defined access to:
openstack share show 5f682131-412a-4024-af2c-e60db0cb10a7
The output will be quite verbose but you are after only the export locations and their paths:
+---------------------------------------+-----------------------------------------------------------------+
| Field                                 | Value                                                           |
+---------------------------------------+-----------------------------------------------------------------+
| access_rules_status                   | active                                                          |
| availability_zone                     | nova                                                            |
| create_share_from_snapshot_support    | False                                                           |
| created_at                            | 2022-05-11T19:27:11.000000                                      |
| description                           | None                                                            |
| export_locations                      |                                                                 |
|                                       | id = f7b80bf4-31c6-46af-a4f7-7e9f6a96496f                       |
|                                       | path = 10.83.82.77:/share_a674245a_dc72_4849_a5c8_bfcc6848957a  |
|                                       | preferred = True                                                |
|                                       | id = 2b27e644-d4ea-4467-9904-67e322d2d3bd                       |
|                                       | path = 10.83.81.248:/share_a674245a_dc72_4849_a5c8_bfcc6848957a |
|                                       | preferred = False                                               |
| has_replicas                          | False                                                           |
| id                                    | 5f682131-412a-4024-af2c-e60db0cb10a7                            |
| is_public                             | False                                                           |
| mount_snapshot_support                | False                                                           |
| name                                  | pirx-sfs-share                                                  |
| progress                              | 100%                                                            |
| project_id                            | 976728e279714cb5a27de3c685803b6c                                |
| properties                            |                                                                 |
| replication_type                      | None                                                            |
| revert_to_snapshot_support            | False                                                           |
| share_group_id                        | None                                                            |
| share_network_id                      | 7357fc07-442a-43c2-984b-7ca03543c7c9                            |
| share_proto                           | NFS                                                             |
| share_type                            | afe43b62-1c79-41e0-bded-05cbf1ab4020                            |
| share_type_name                       | SFS                                                             |
| size                                  | 1000                                                            |
| snapshot_id                           | None                                                            |
| snapshot_support                      | False                                                           |
| source_share_group_snapshot_member_id | None                                                            |
| status                                | available                                                       |
| task_state                            | None                                                            |
| user_id                               | 035e6a94dce14122a5fd1e0f23562241                                |
| volume_type                           | SFS                                                             |
+---------------------------------------+-----------------------------------------------------------------+
The path from export_locations you need is marked as True:
10.83.82.77:/share_a674245a_dc72_4849_a5c8_bfcc6848957a
Step 5 Mount the share
In console, use command
mkdir to create a folder called share where the shared access will be provided and then use command
ll to list the contents of the virtual machine:
eouser@pirx-vm:~$ mkdir share
eouser@pirx-vm:~$ ll
total 32
drwxr-xr-x 5 eouser eouser 4096 May 13 10:42 ./
drwxr-xr-x 4 root   root   4096 May 13 09:28 ../
-rw-r--r-- 1 eouser eouser  220 Feb 25  2020 .bash_logout
-rw-r--r-- 1 eouser eouser 3771 Feb 25  2020 .bashrc
drwx------ 2 eouser eouser 4096 May 13 09:29 .cache/
-rw-r--r-- 1 eouser eouser  807 Feb 25  2020 .profile
drwx------ 2 eouser eouser 4096 May 13 09:28 .ssh/
drwxrwxr-x 2 eouser eouser 4096 May 13 10:42 share/
Now that the share folder exists, you can mount the export location:
eouser@pirx-vm:~$ sudo mount 10.83.82.77:/share_a674245a_dc72_4849_a5c8_bfcc6848957a /home/eouser/share
To see the effects of this command, execute
mount | grep nfs
Finally, see the space allocated on the disk with
df -h
Here are all these commands combined:
In this step you have defined and created share file system access to a folder share, sized 1000 gigabytes.
Step 6 Create Test File And Show That it Persists in Mounted Folder
Move to the share folder and show its contents:
eouser@pirx-vm:~$ cd share
    eouser@pirx-vm:~/share$ ll
    total 8
    drwxr-xr-x 2 nobody 4294967294 4096 May 11 19:27 ./
    drwxr-xr-x 5 eouser eouser     4096 May 13 10:44 ../
Two users are present:
nobody – user that has no special permissions and is to be used with NFS only,
eouser – user that you are using to issue commands.
To test, create an empty text file and show the contents of the folder:
eouser@pirx-vm:~/share$ sudo touch test.txt
eouser@pirx-vm:~/share$ ll
total 8
drwxr-xr-x 2 nobody 4294967294 4096 May 13 11:06 ./
drwxr-xr-x 6 eouser eouser     4096 May 13 11:02 ../
-rw-r--r-- 1 nobody 4294967294    0 May 13 11:06 test.txt
To test the persistency, unmount the share (meaning, delete access to it):
eouser@pirx-vm:~/share$ cd ..
eouser@pirx-vm:~$ sudo umount /home/eouser/shareeouser@pirx-vm:~$ cd share
eouser@pirx-vm:~/share$ ll
total 8
drwxrwxr-x 2 eouser eouser 4096 May 13 10:42 ./
drwxr-xr-x 6 eouser eouser 4096 May 13 11:02 ../
The share is missing. Now mount it again:
eouser@pirx-vm:~/share$ cd ..
eouser@pirx-vm:~$ sudo mount 10.83.82.77:/share_a674245a_dc72_4849_a5c8_bfcc6848957a /home/eouser/share
eouser@pirx-vm:~$ cd share
eouser@pirx-vm:~/share$ ll
total 8
drwxr-xr-x 2 nobody 4294967294 4096 May 13 11:06 ./
drwxr-xr-x 6 eouser eouser     4096 May 13 11:02 ../
-rw-r--r-- 1 nobody 4294967294    0 May 13 11:06 test.txt
Mounted also makes it present so the files are persistent regardless of the share being mounted or not.
NFSv4 StorePool Resource Information
Currently, there are no per-user limits defined (PerClientStorePoolThreshold: NFSv4). However, there are general per-IP limits, which allow up to 128 concurrent NFSv4 sessions per IP.
What are StorePools?
Information about NFSv4+ states in memory allocations is stored in so-called storePools.
A storePool is a collection of memory allocations used to facilitate NFSv4/4.1 state operations.
There are 12 different storePool pairs, each serving different areas of state management.
Each node has its own storePool resources, stored in the Network blade (nblade) of the node. These resources are used by clients mounting LIFs local to that node.
StorePools are strictly for NFSv4/4.1 state work. They do not track open or locked files at the file system layer (dblade).
If a storePool becomes exhausted, it happens at the nblade layer of the node where the LIF is mounted.
How can specific Clients cause problems?
In certain cases, clients fail to close their OPENs (storePool open allocations) in the way the server expects.
When this occurs, the client may be unaware that an OPEN is still allocated.
The server will then keep the associated OpenState object, and the resource is never released back into the pool.
Over time, this behavior can lead to storePool exhaustion, as orphaned resources accumulate on the server.
Once the problematic client is restarted, its associated storePool resources are released and returned to the pool.
What To Do Next
Shared File System with manila OpenStack offers the ame functionality Amazon Elastic File System (EFS). You can
create a remote file system,
mount it on your instances, and
then read the data from it as well as write to it from of your instances (virtual machines).
It has security elements built in as well. Access rights for each instance can be changed during run time. For more on security, see article How To Increase Security For Shared File System Based On Manila OpenStack.